Web Interface
User Interface Layout

Camera image
Quick control icon bar
Status icons
ARZoom image
Quick menu
Search
Search result
Status Icons
 Power normal
 Unstable power
 Sky recognized
 Sky recognition failed
 Don’t eject USB
 System update in progress
 GPS valid
 GPS input required
 Inave save on
 CPU temperature is in a normal range
 CPU is overheated
 USB recognized
Quick control icons
 Screen lock/unlock
 Zoom in
 Zoom out
 Image rotation
 Advanced setting menu open/close
 Live sky recognition on/off
 Staker on/off
 Star search
 Open/close star list
 Camera align mode on/off to the main telescope
 Augmented reality mode on/off
 Star display on/off
 DSO display on/off
 Nearest DSO auto display on/off
 Constellation display on/off
 Time lapse start/end
 Night mode on/off
 Elliptical grid on/off
 Azimuth grid on/off
 Full screen mode (Android and Desktop only)
 Polar align mode start
 Image download
 Eject USB memory
 Refresh screen
 Power off
Camera Control Menu
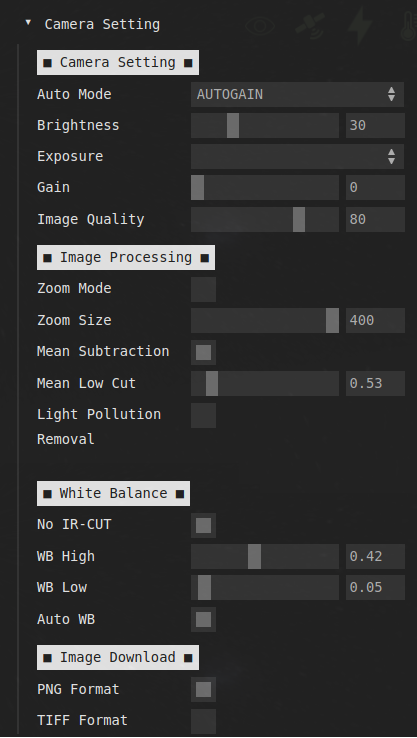
Auto Mode: Auto exposure mode selection. AUTOGAIN fixes exposure and only adjusts the gain.
Brightness: Sensor auto exposure level. Gain or exposure will be automatically adjusted to meet this value.
Exposure: Sensor exposure time in second.
Gain: Sensor gain.
Image Quality: JPG image quality in percentage. A higher value increase file size and image quality but slower the frame transfer rate.
ZoomMode: Turn on this option to receive the cropped image at a faster frame rate. This option is useful when adjusting the focus.
ZoomSize: Image size in pixel.
Mean Subtraction: Check this option to subtract the mean pixel value from the image. This can be used to remove light pollution from the image.
Mean Low Cut: Mean subtraction level.
Light Pollution Removal: This will remove the gradient caused by light pollution. Note that Mean Subtraction above cannot handle light pollution with gradient.
No IR-CUT: Check this option when the IR-CUT filter is removed. This will disable the wrong color correction.
AUTO WB: Automatic white balance. Select this option when IR-CUT filter is removed. The system tries to adjust the white balance without IR-CUT filter.
PNG Format: Png format image download.
TIFF Format: Raw format image download.
Astro Tools Menu
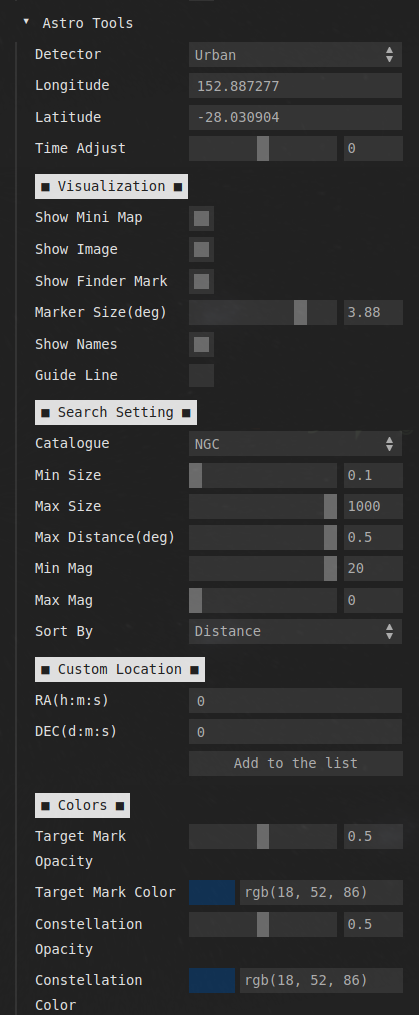
Detector: Star detector method selection.
Longitude: Longitude of your location.
Latitude: Latitude of your location.
Time Adjust: This can adjust system time to preview the sky at a given time
Show Mini Map: Mini image turn on/off
Show Image: Uncheck this option if you only want to see the red circle marker
Show Finder Mark: Uncheck this option if you want to remove the red circle marker
Marker Size: Adjust this slider to adjust the red circle marker size identical to your main telescope
Show Names: Uncheck this if you want to hide all names
Guide Line: Check this option if you want to see azimuth and elevation guideline in guide mode
Catalog: This is the star catalog that the automatic nearest star search feature uses.
Min/Max Size: Any DSO larger/smaller than these values will not be automatically searched. Adjust the min/max value according to your main telescope’s field of view.
Max Distance: Search boundary. A larger value will search a wider area.
Min/Max Mag: Any DSO darker/brighter than these values will not be automatically searched. Adjust the min/max value according to your preference.
Sort By: When the auto search button is clicked in the star list, the found stars will be sorted by this option.
RA(h:m:s), DEC(h:m:s): Custom RA, DEC location for comet and etc. Click “Add to the list” button to add the custom location to the star list.
Timelapse Menu
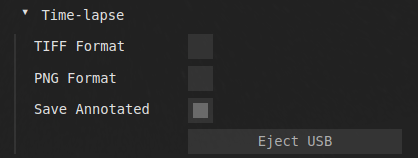
You can select different formats for the timelapse image saving feature. When you press the timelapse icon , the system will write the images in the format you selected above.
Tiff and png format will save raw images whereas “Save Annotated” will save the image with additional information such as the direction of the main telescope
System Setting Menu
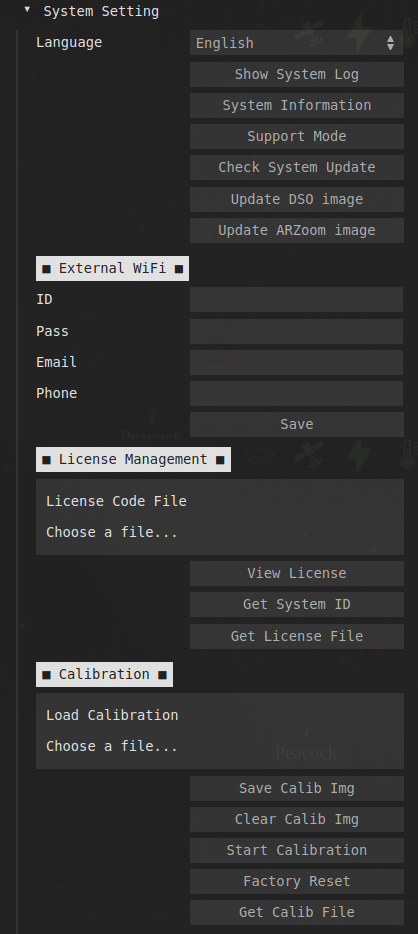
Support Mode: Check this to let our support team remotely diagnose your device. Please speak with our support team first before you use this option.
ID: External wifi’s SSID
Pass: External wifi’s password
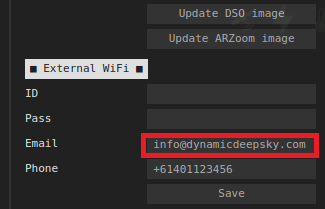
Email: Put your email here to receive the IP address of the device when it is connected to the network. Note that the email from Astroid is often filtered and delivered to your spam email box.
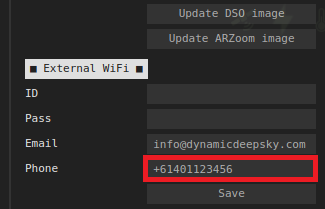
Phone: Enter your phone number in international format to receive the IP address. The message will be sent only once a day.
Region |
Number |
|---|---|
Japan |
+61 |
Korea |
+81 |
Australia |
+82 |
For example, if you connect your device in Australia with the phone number 0401 123 456, you should put it as follows.
Get License File: You can download your license file by clicking this button. The downloaded license file can be used to recover your license setting after you recover the system. If you have not stored this license file, download the system ID by clicking “Get System ID” and contact us.
Collimation Menu
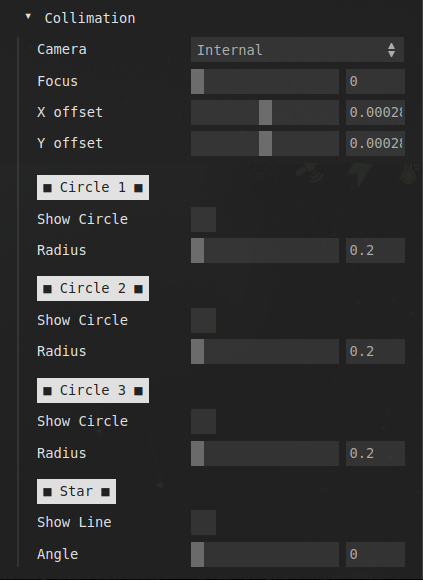
Camera: Currently only internal camera is supported
Focus: Focus control for the external auto focus camera
X Offset: To move the circle around x axis
Y Offset: To move the circle around y axis
Setting Up License
Astroid’s basic system and apps are protected by HW license keys. For this reason, if you recover your device from the recovery image, you have to recover the license as well. This requires uploading the license file to the web interface. The license file can be downloaded by clicking “Get License File” button in the system setting menu. It would be a good practice to download the license file and store it on your computer once you receive the device.
To upload the license file, go to the system setting menu and click License Code File button and select the license file you stored on your computer.
In case you can’t access the license file, please send us your system ID and serial number. Our staff will send you the license file as soon as possible.
Also, if you replace Raspberry Pi 4, the original license code would not work. So, if you have any Raspberry Pi related problems, please contact us rather than replace the Raspberry Pi yourself.
Hot Pixel Correction
The number of hot pixels naturally increases over time. These hot pixels are especially noticeable if you run EAA stacker with tracking option on. Astroid has a built-in hot pixel detector and corrector. But to correct the hot pixel you need to manually activate the hot pixel detector. Please, follow the procedure below to detect and correct the hot pixels.
Completly block the sensor using the provided sensor lid. Turn off every light around the room and make the room completely dark.
Go to the camera setting and increase exposure to 1 second and set the gain to 150.
Go to the system menu and adjust the hot pixel level. A lower value will pick more hot pixels.
Click the hot pixel correction button.
Run EAA stacker and see if hot pixels are disappeared
Try with the default value and if you still see some weak hot pixels, lower the value and repeat the above until satisfactory.
Writing Images to USB Memory
Prepare a DDS USB. Refer to the next section to make a DDS USB
Insert the USB to Astroid and see if USB icon
appears on the top status barClick the timelapse button to start recording
Warning
Use high-speed USB memory only. With low-speed USB, Astroid will continue to write files to USB even after you finished recording which will drastically increase the chance of file corruption.
How to eject
USB must be ejected after the eject button is clicked and all the USB related icons are disappeared. Otherwise, the USB will be corrupted and you will lose all data in the USB.
Making DDS USB
Prepare a SanDisk 32GB Ultra Fit or equivalent. High-speed USB memory is highly recommended to prevent any data lost
Format the disk with NTFS format and change the name to DDS.
Insert the USB to Astroid and see if the USB icon appears on the top.