Quick Start Guide
Start Astroid
Connect Astroid to a USB power. Make sure to use a stable power source that has at least 5V 3A capacity.
Open up your wifi setup on your mobile device or desktop and find DDS_DIRECT_your_serial. Password is 12345678
Open your web browser and type 10.10.10.10 or astroid.local

Note
If 10.10.10.10 does not work try http://10.10.10.10 instead of 10.10.10.10. Some web browsers add https infront of the IP address which make it fail to find the device.
You should see the rotating logo soon
Note
The system wake-up usually takes about a minute. If you can’t find the SSID in 2 minutes after connecting the power, try to reboot the system by disconnecting and connecting the power. If you can’t start the system after multiple trials in this way, your power source might be not enough to stably run Astroid. Please try another power source. For more information, please refers to the manual.
Quick Menu
For quick control of the camera, open the quick menu by clicking the menu icon ![]() on the top left corner.
on the top left corner.
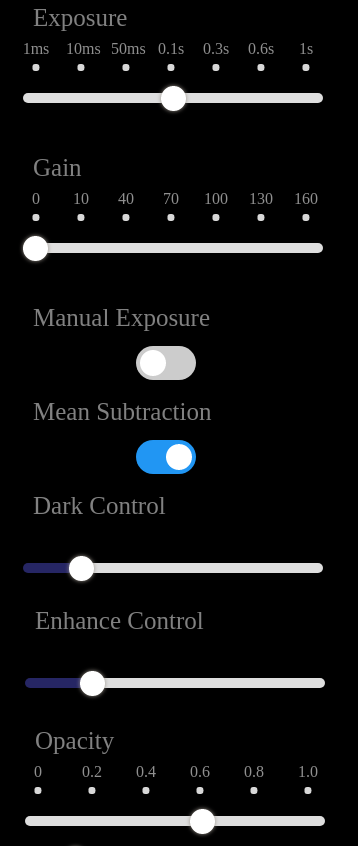
Exposure: Sensor exposure time. Longer exposure is available in the setting menu.
Gain: Sensor gain. High exposure drastically increases noise. Enabling stacking or increasing exposure will reduce the noise.
Manual Exposure: Enabling this will automatically adjust gain or exposure to meet the desired image brightness. More auto exposure controls can be found in the setting menu.
Mean Subtraction: Enabling this will subtract the mean pixel value from the entire image to remove light pollution.
Dark Control: Move the slider to the left to make it darker. This only works when the stacker is enabled.
Enhance Control: Moving this slider to left will amplify a small image signal. This can be used to observe a faint object.
Opacity: Adjust this slider to control line brightness.
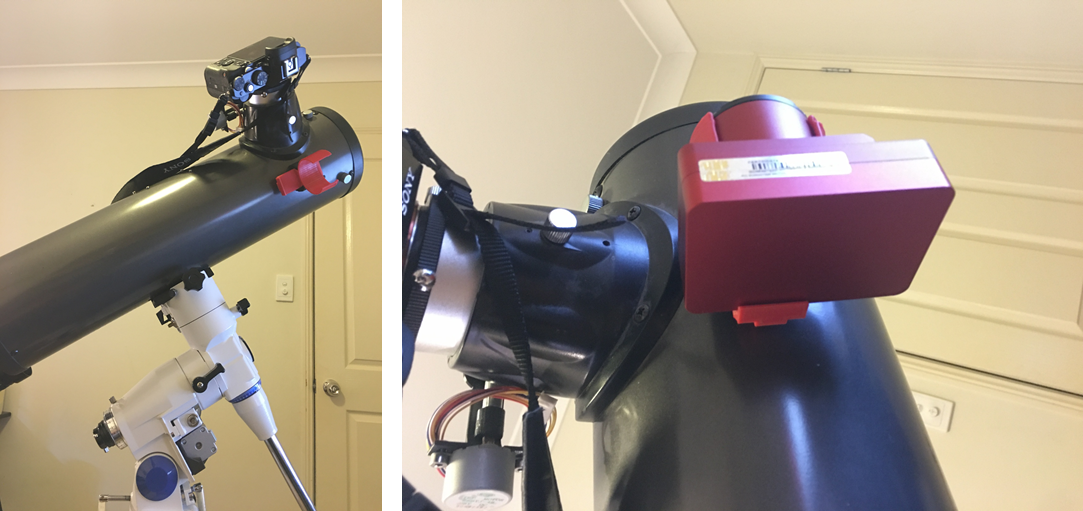
Lens Mount
Astroid Multi can be used in two different ways. If you would like to use the sky recognition feature in eFinder and Dr. Pole, please mount the provided 5mm lens to the camera body.
eFinder
This feature of Astroid completely substitutes the conventional dot finder or finder scope. With the built-in image sensor and the basic lens, you can use Astroid as an electronic finder. Astroid’s eFinder does not just show you a sky image but can tell you what are you looking at and guide you to the sky objects you would like to see.
Starting eFinder
Follow the procedure below to start eFinder.
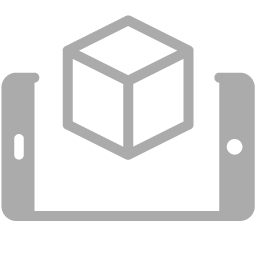
Mount the holder to your telescope.
Slide Astroid camera into the holder and lock the bolt on the holder using the provided hex key.
Rotate the lens to adjust focus if it is the first time. But the focus is adjusted to the right position when assembled in the factory. Please do this step only when required.
Click the eye button
 to start live sky recognition.
If you would like to use 3D planetarium, you need to enter your GPS location in the system. However, if you don’t want to put GPS or GPS information is not available, use AR mode
 instead. AR mode represents the night sky with respect to the image. Refers to the next section for more details on GPS location. Automatic GSP setup will be available in the future update.
Align Astroid to the main telescope lens. To show the alignment joystick, click align icon
 on the down side icon bar. See the next section for more details.
Star Searching with eFinder
Touch/click the finder icon
 on the bottom and search any object you want to find by typing a star ID or name. You can use search keyword such as “M1”, “ngc3372”, “orion”.
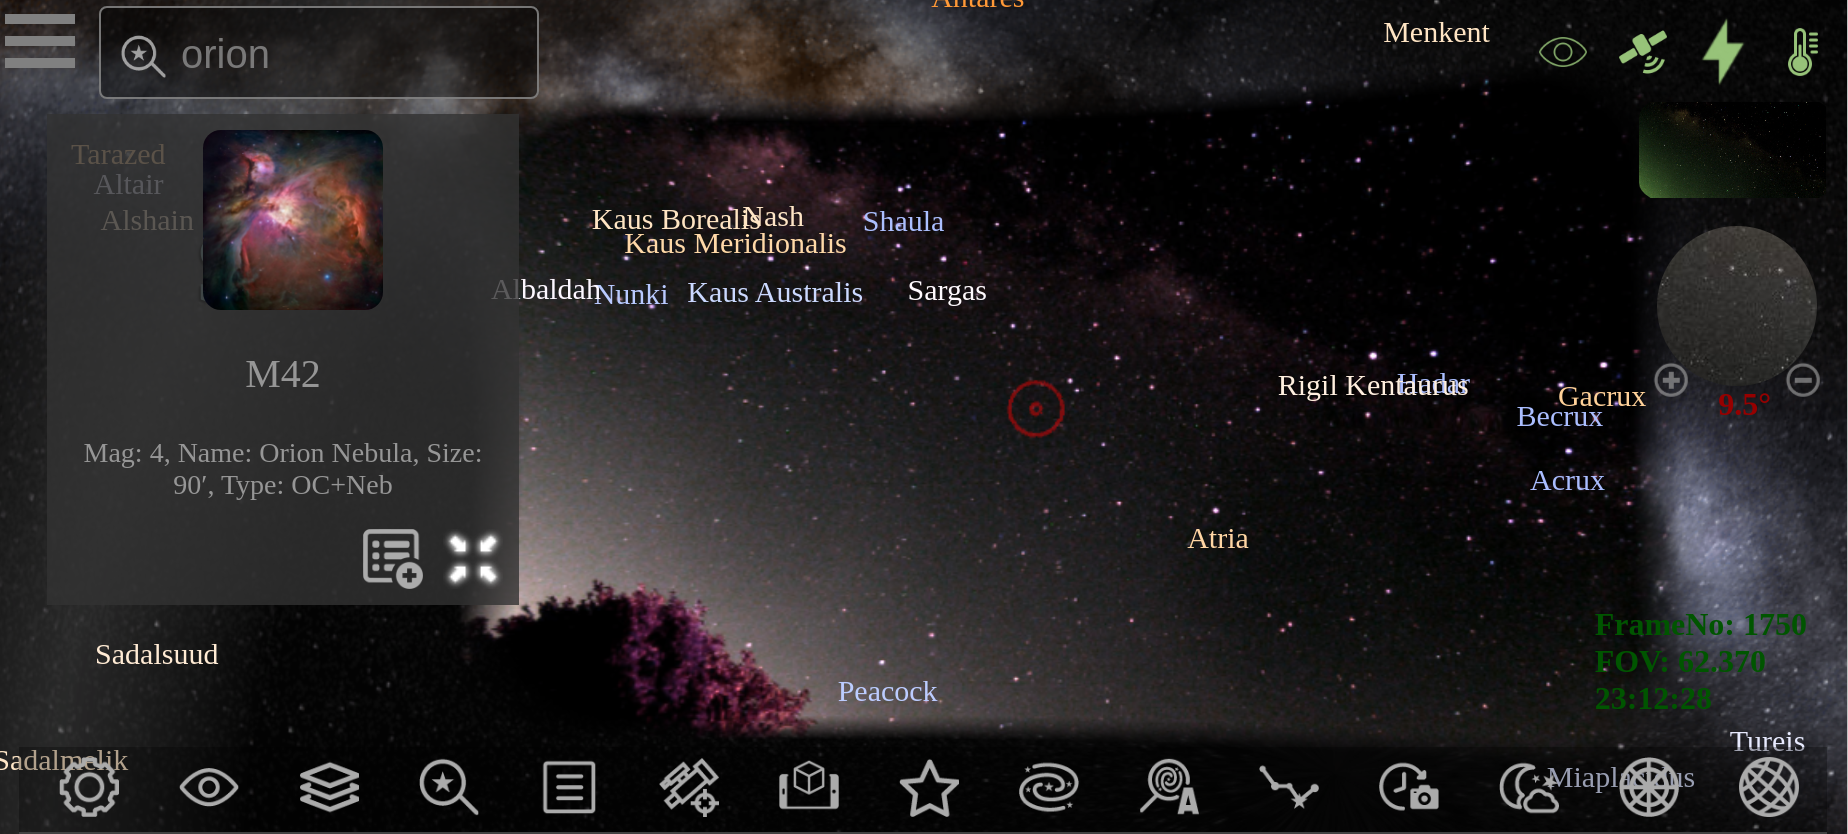
Touch the location preview icon
 to see the location and trail of the star or touch the photo to start the guide mode. The guide mode will tell you which direction you should move your main telescope to see the target start.
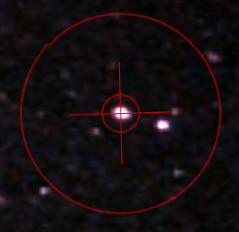
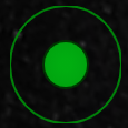
Red target mark is what your main lens is looking at and the green mark is where you need to move your telescope. The small arrow around the red target is the direction you should move to.
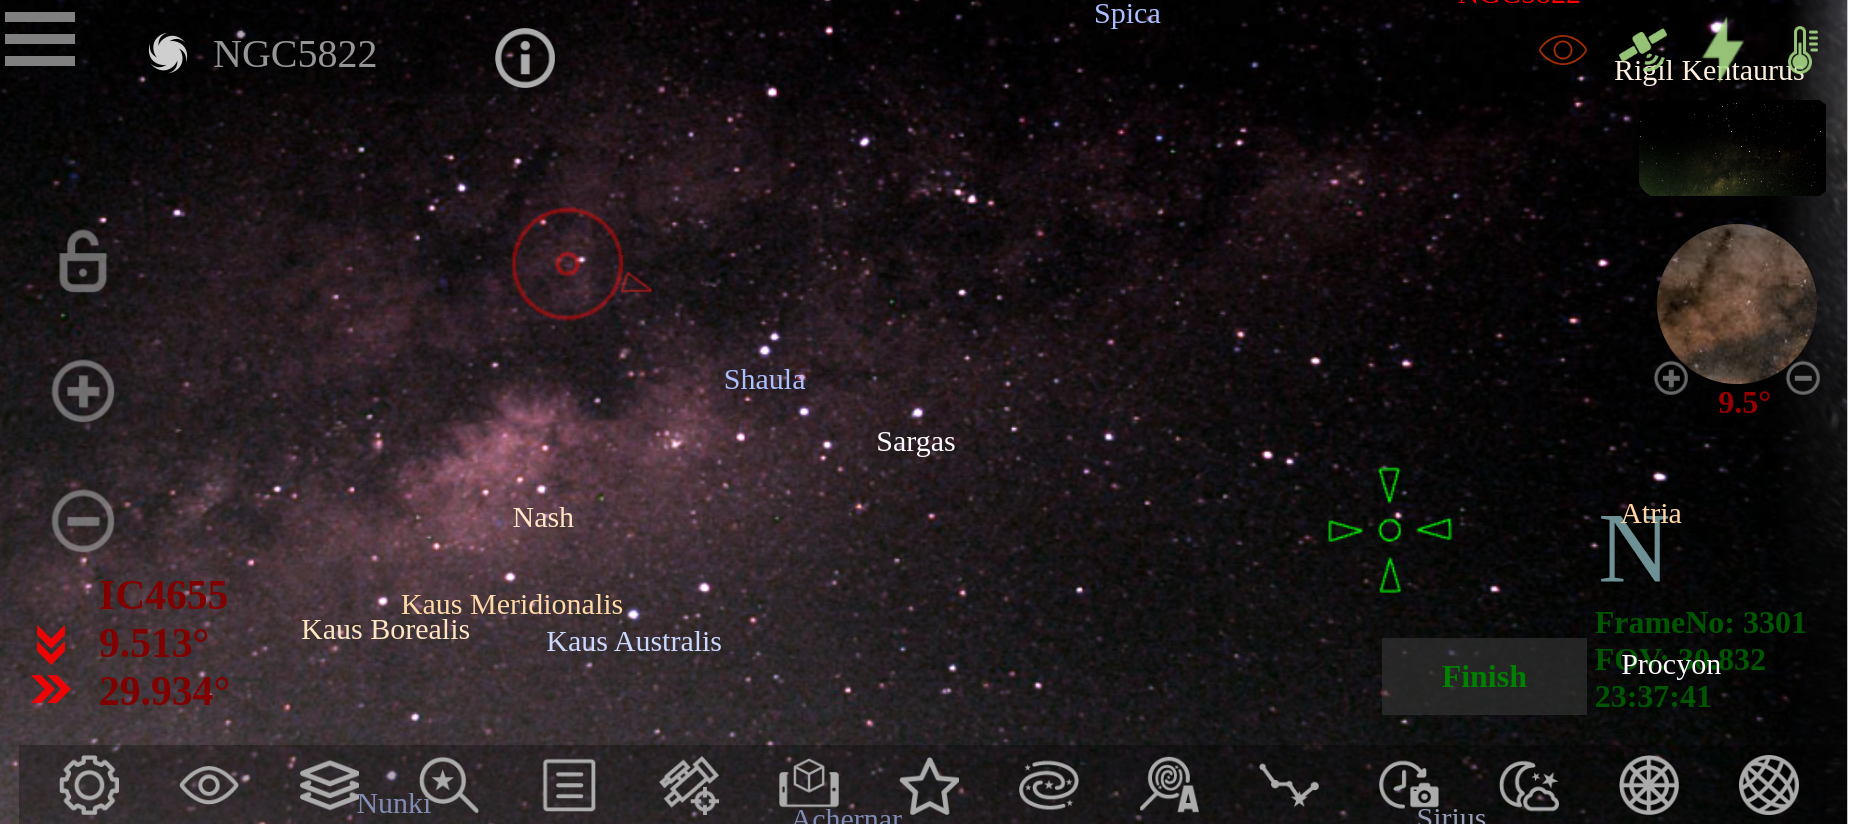
Move your mount slowly so that the red target mark and green mark meet
When the target star is close to the main scope, a fine tuning target board will appear on the top left corner to assis you with fine movement.
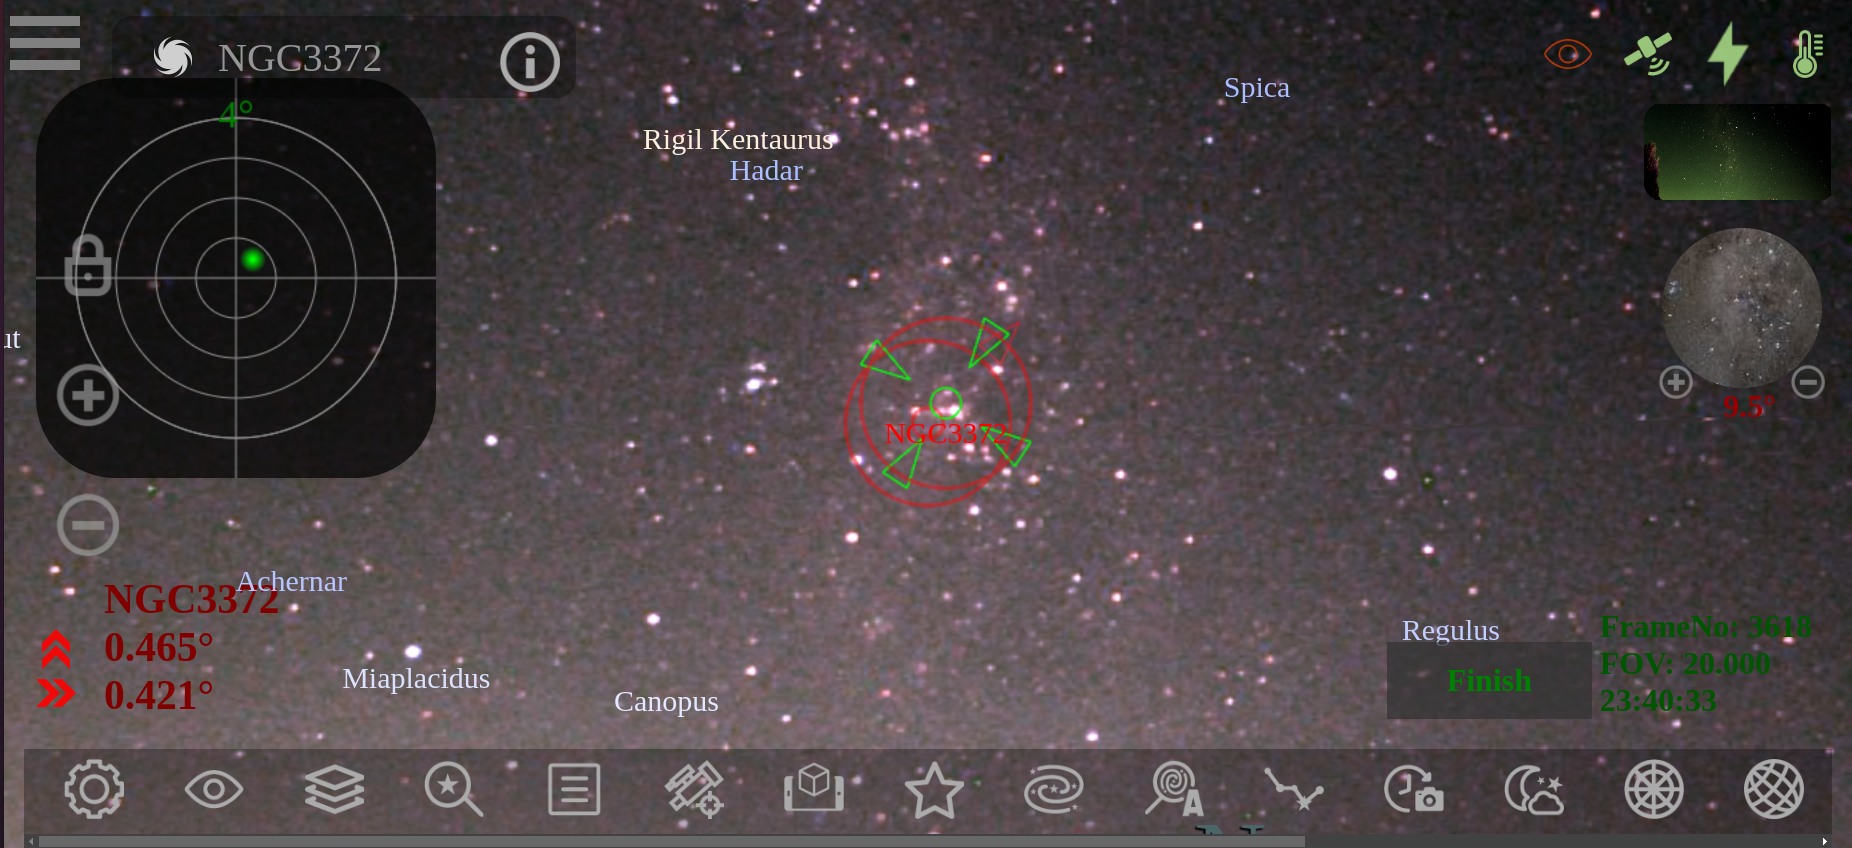
If you see the target object in your main telecope’s eyepiece, terminate the guide mode by clicking “Finish” button on the left bottom corner.
Tips
Once the sky is recognized, move your mount slowly so that Astroid does not lose the recognized stars. Once it lost the stars, it will take about 2~5 seconds to recover.
GPS Location
The 3D planetarium feature requires the GPS location to draw the night sky pattern above your location.
If it is the first time use or the location you use Astroid is far away from the last location, update the longitude and latitude value under Astro Tools menu. Click the setting  icon to show the menu.
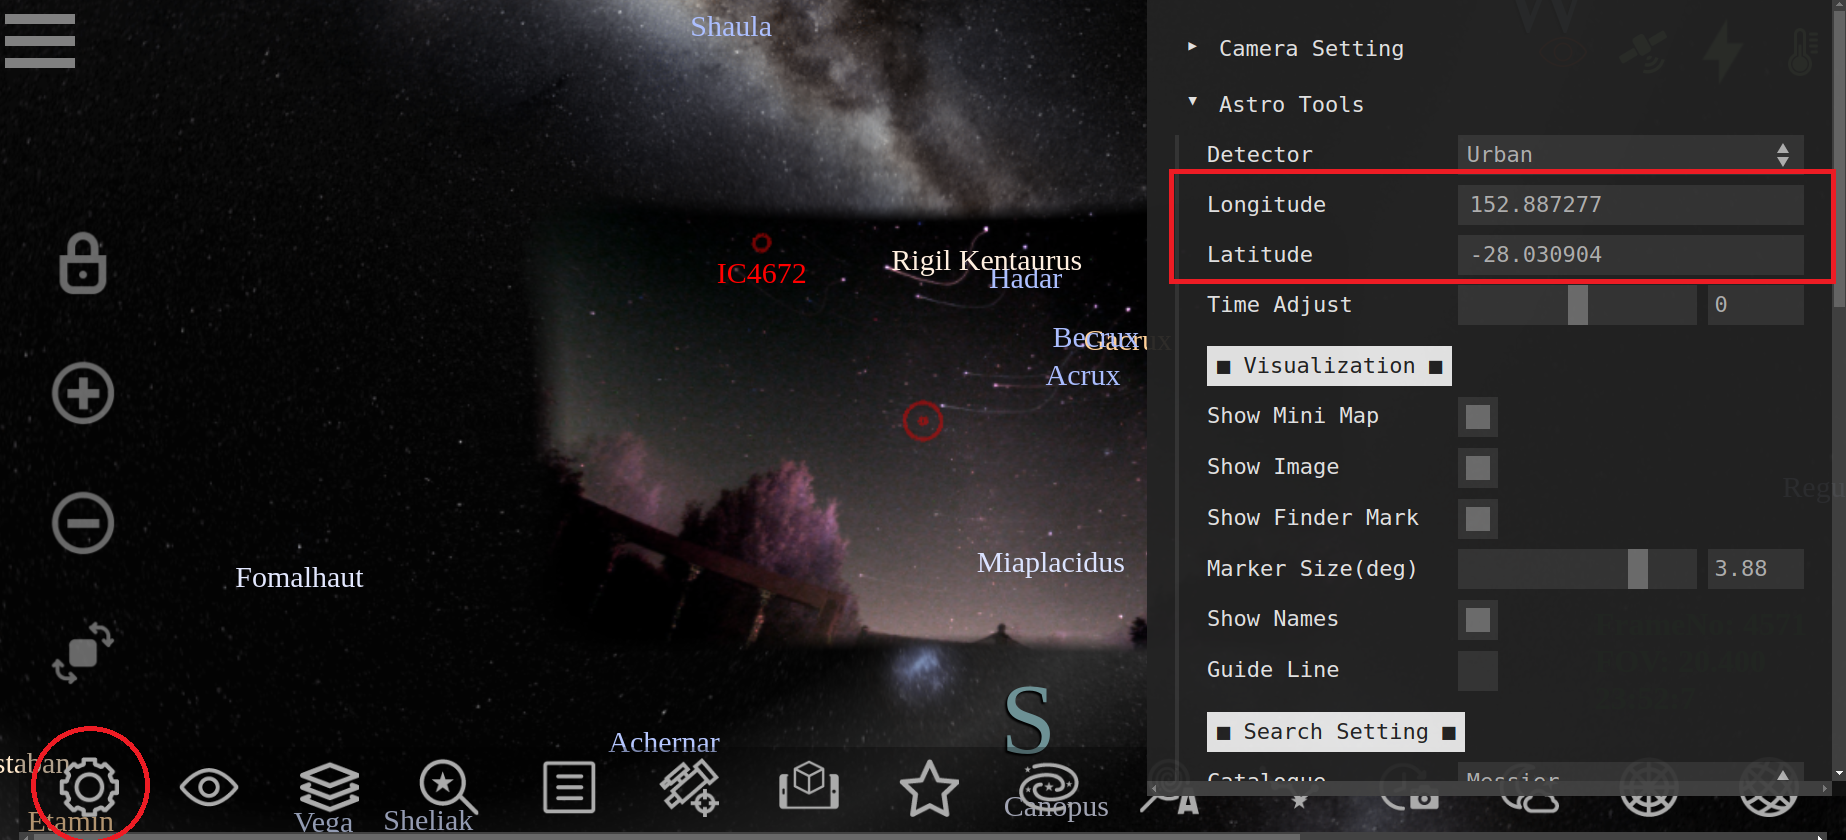
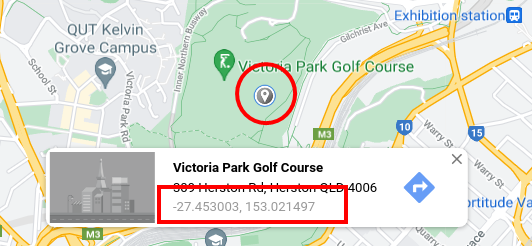
If you don’t know your longitude and latitude, go to google maps and see what is your longitude and latitude. This manual GPS input will be changed to automatic in the future update.
Location |
long |
lat |
|---|---|---|
Australia Brisbane |
152.887277 |
-28.030904 |
Korea |
127.667991 |
36.664273 |
New Zealand |
174.807480 |
-36.866884 |
Italy milano |
9.184879 |
45.466708 |
US Kansas |
-98.139525 |
38.396799 |
Japan |
140.002557 |
35.736418 |
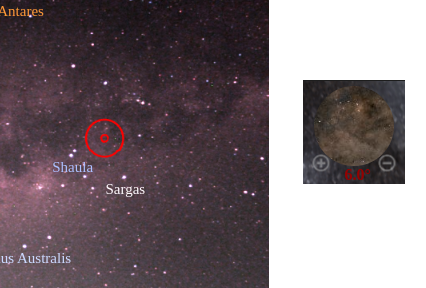
ARZoom
ARZoom will show you a virtual view of your main telescope. If you set it to the same FoV of your eyepiece you will see the same view as the ARZoom image in your eye piece. Note that the red circle is your main telescope view and ARZoom will display the sky image around the red circle. You can zoom in or out as you want by pressing +/- button under the ARZoom window.
This feature only works when the sky is recognized.
eFinder Align
If you would like to use Astroid as a finder along with your main telescope, you have to align Astroid to your main telescope view just like what you do with a conventional finder scope but in a digital way. Follow the procedure below to align Astroid to your main lens.
Adjust your telescope to put a bright and distinctive object in the center of the eyepiece. Street light or house window light is useful for this. Starlight is not recommended as it is not very distinctive and is moving.
Press the eye button
to start sky recognition mode.Press the align icon
on the down side icon bar to turn on the align mode.Identify the location of the bright object in the image
Adjust the joystick to move the red target mark toward the object
Target mark
Joystick
Press the align icon
again to terminate the align mode. This will automatically save the current location so that you do not need to do the alignment next time.
Tips
Zoom out to move fast and zoom in for fine tuning. Target mark move speed changes according to the screen view angle.
Important
The first alignment is highly recommended to be done at sunset rather than a dark night. If you have a bright object like a street light around your telescope point your telescope to that object and then use the joystick to move the target mark. But the alignment can be done at night too using stars.
Live Image Stacking
Electronically Assisted Astronomy (EAA) stacker offers a set of tools that make the live stacking and registration easy. You can use this feature either for the basic lens, DLSR lens, or telescope.
Basic Lens
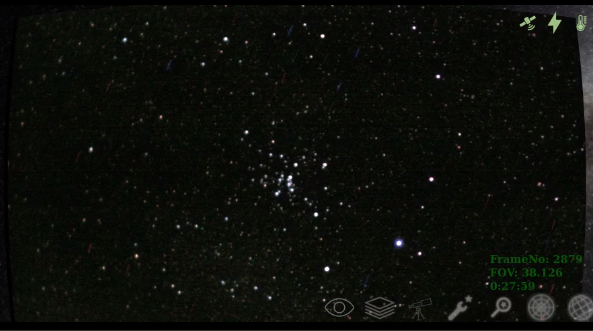
When the stacker is used with the basic lens, you can observe the Milkway in real-time.
To use the EAA stacker with the basic lens, just click the stack icon  .
.
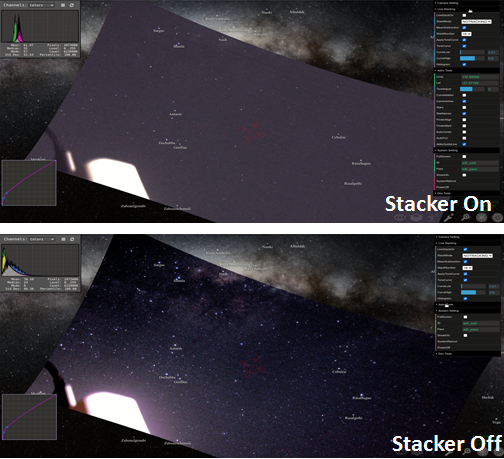
When stacking is enabled in eFinder mode, the stacked image will be aligned to the sky. You can enable eFinder features such as displaying a constellation  as shown in the following example.
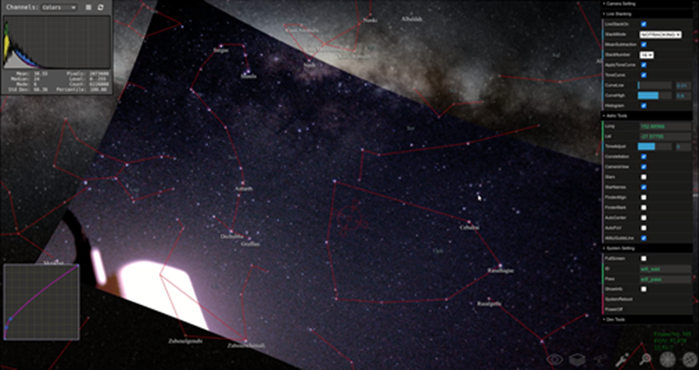
Also, once the sky is recognized you can click and figure out the name of the shiny sky object.
Custom Lens
DSLR lens or telescope lens can be mounted on Astroid after removing the basic lens. When EAA stacker is used with these two types of lenses, it will give you a much brighter image of the sky object than observing them with the bare eye.
If you use a high magnification lens, turn on Auto registration mode. EAA stacker will automatically register moving star images to the first image so that you can obserbe the target without a star tracker.
Follow the procedure below to use EAA stacker with a DSLR lens or telescope lens.
Slide the camera into 2 inch scope eyepiece holder. Optionally you can use provided 1.25 inch extension tube to slide it into an eyepiece hole on your telescope.
Set exposure to 0.3 seconds and gain to 150 for fast focusing
Adjust your telescope’s focus knob and see any star appears on the screen. Finding the right focus could be a challenging job if you do it at night. Do it when it is not too dark and leave a mark around your telescope focuser so that you can easily set the focus to the near position next time.
Click the stack icon
on the bottom icon bar to start the image stacking. Image tone curve setting is automatic by default but for an advanced user it can be adjusted to make it look better.
Stacking will show the best result if F number is low e.g. F2 or lower.
Stacking result on Samyang 85mm@F2.
The following shows the images captured with Astroid on Celestron 90GT without the mount star tracking on.
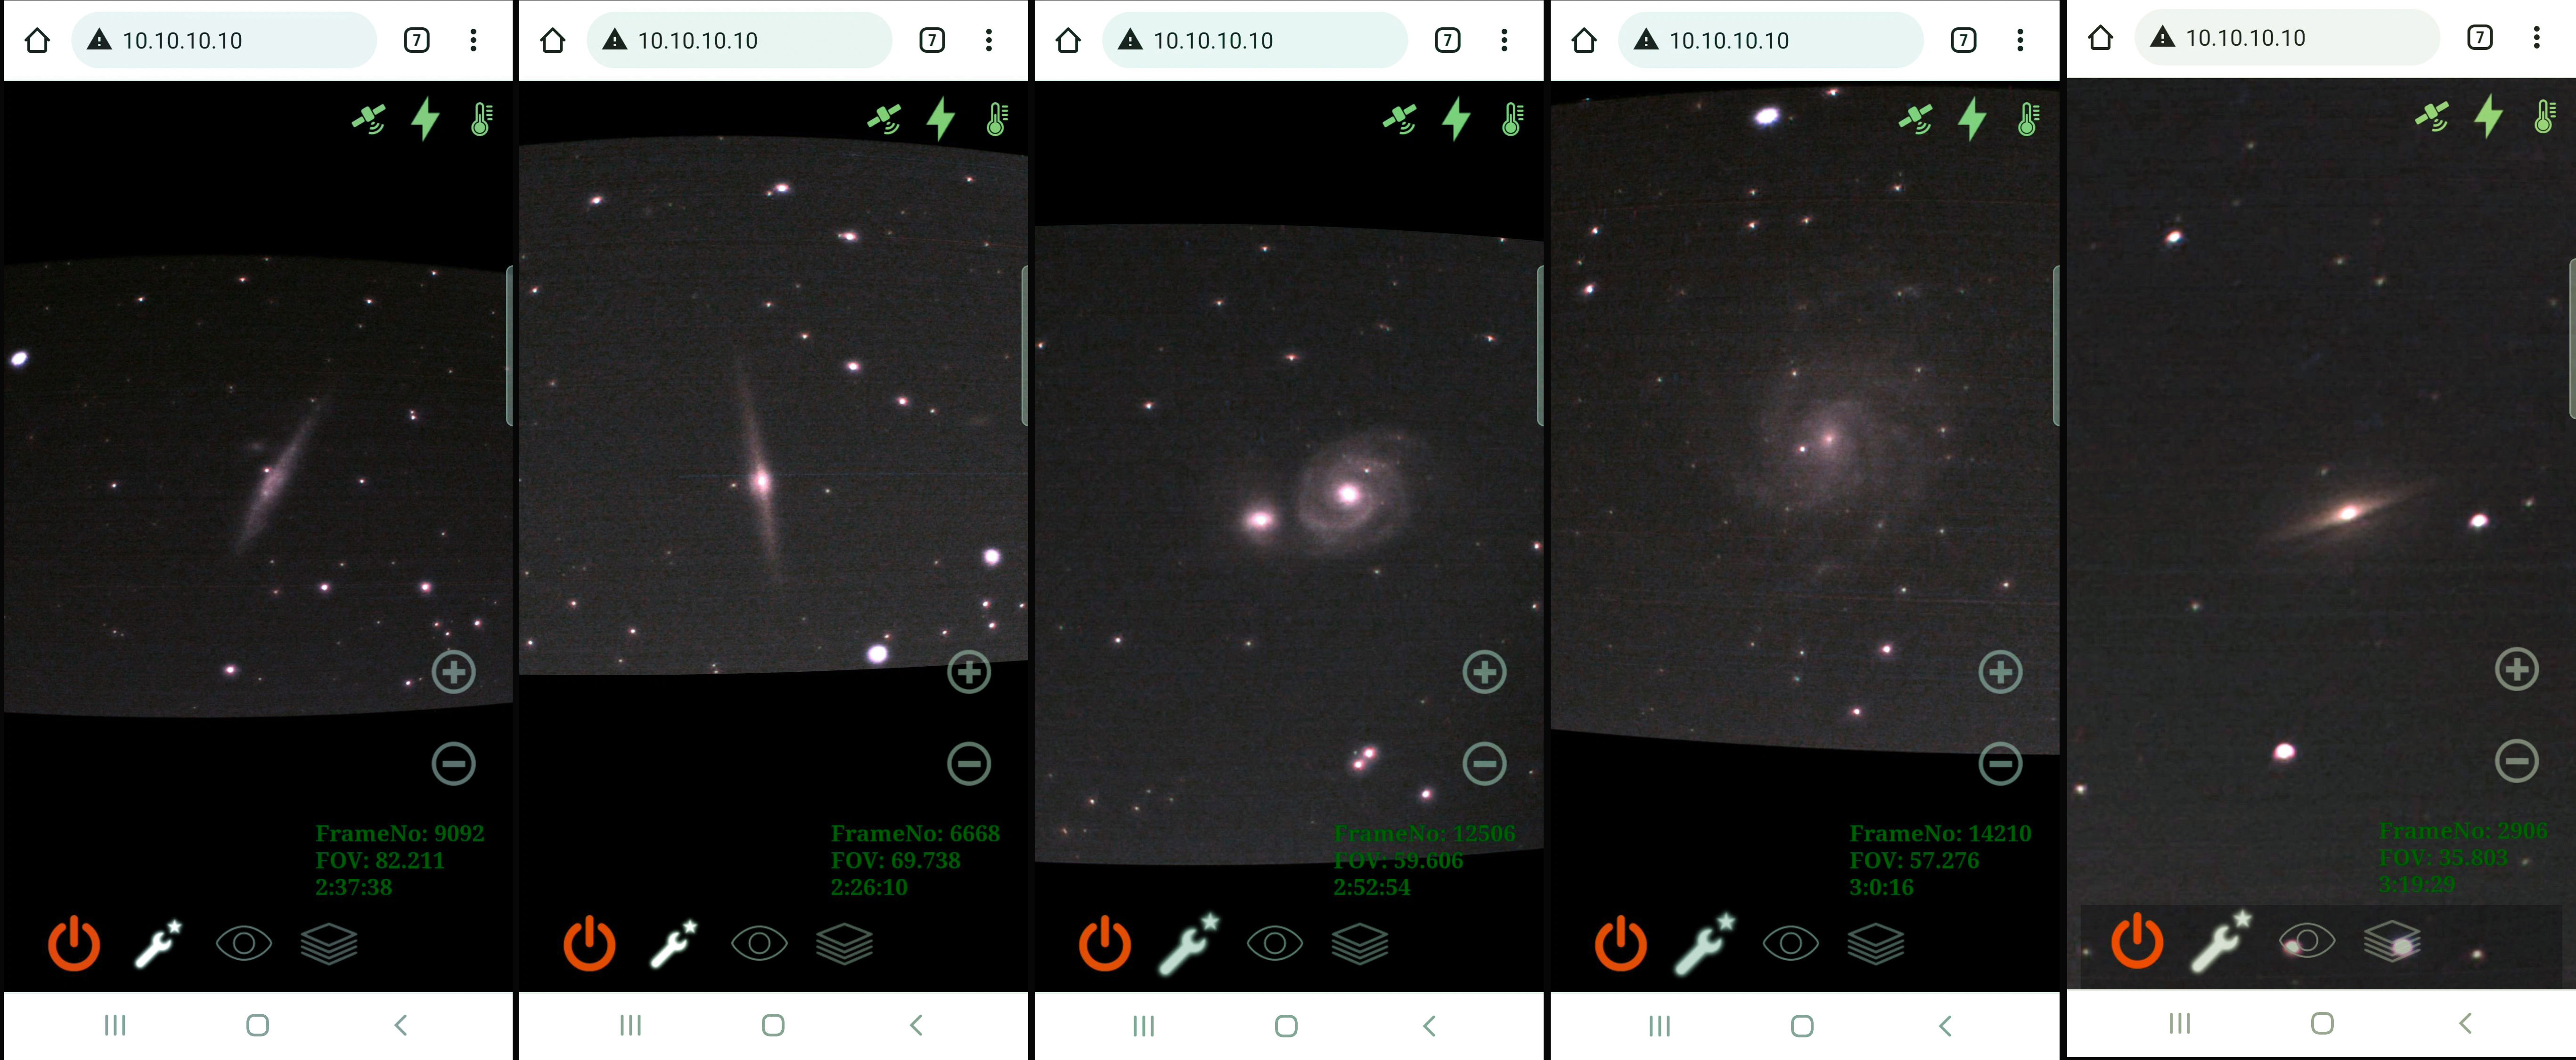
Image credit: youtuber 우주in
Timelapse
You can record the images to make a timelapse. Press the timelapse icon  to start the recording after inserting a DDS USB. Refers to Making DDS USB, regarding a DDS USB.
Polar Alignment with Dr. Pole
Dr. Pole is a standalone polar alignment assistant tool for EQ mounts. Compared to the existing solution, Dr. Pole does not require the pole star to be within the camera view which makes the polar alignment much easier when you are in the Southern hemisphere or when the pole star is not visible around your place due to a tree or building.
Follow the procedure below for the polar alignment.
Mount the holder to your telescope.
Slide Astroid camera into the holder and tighten it.
Tips
Not like the other products, Astroid can be mounted on the DEC axis or directly on the telescope tube. This gives you more flexibility when the pole star is not visible. But you can mount Astroid on the RA axis too.
Click the eye button
to start live sky recognition and wait until the sky is recognized.Click the telescope icon
 on the bottom icon bar.
Move the RA axis of the telescope to the first position (-30 degrees) and wait until the sky is recognized
Press the next button and move the RA axis again to 0,+30 degrees and repeat 6,7 for two more times.
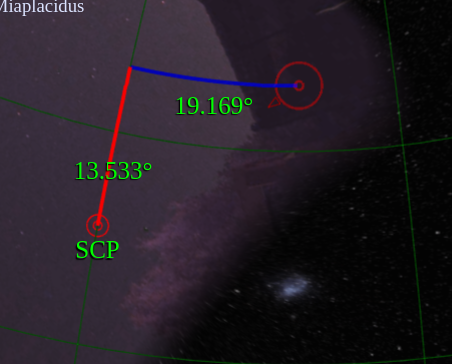
Once the axis finder is normally finished, you can start the alignment mode by pressing the “Start” button on the right downside corner.
The red circle mark is your rotation axis and SCP/NCP is the pole location. Adjust your mount base according to the guideline so that the red circle mark is close enough to the pole location.
How to Turn Off Astroid
Press PowerOff button

Wait until you see the goodbye message on the screen
Unplug the power
Important
If you cut the power without parking, sometimes the SD card is corrupted and you have to recover it to the factory setup.